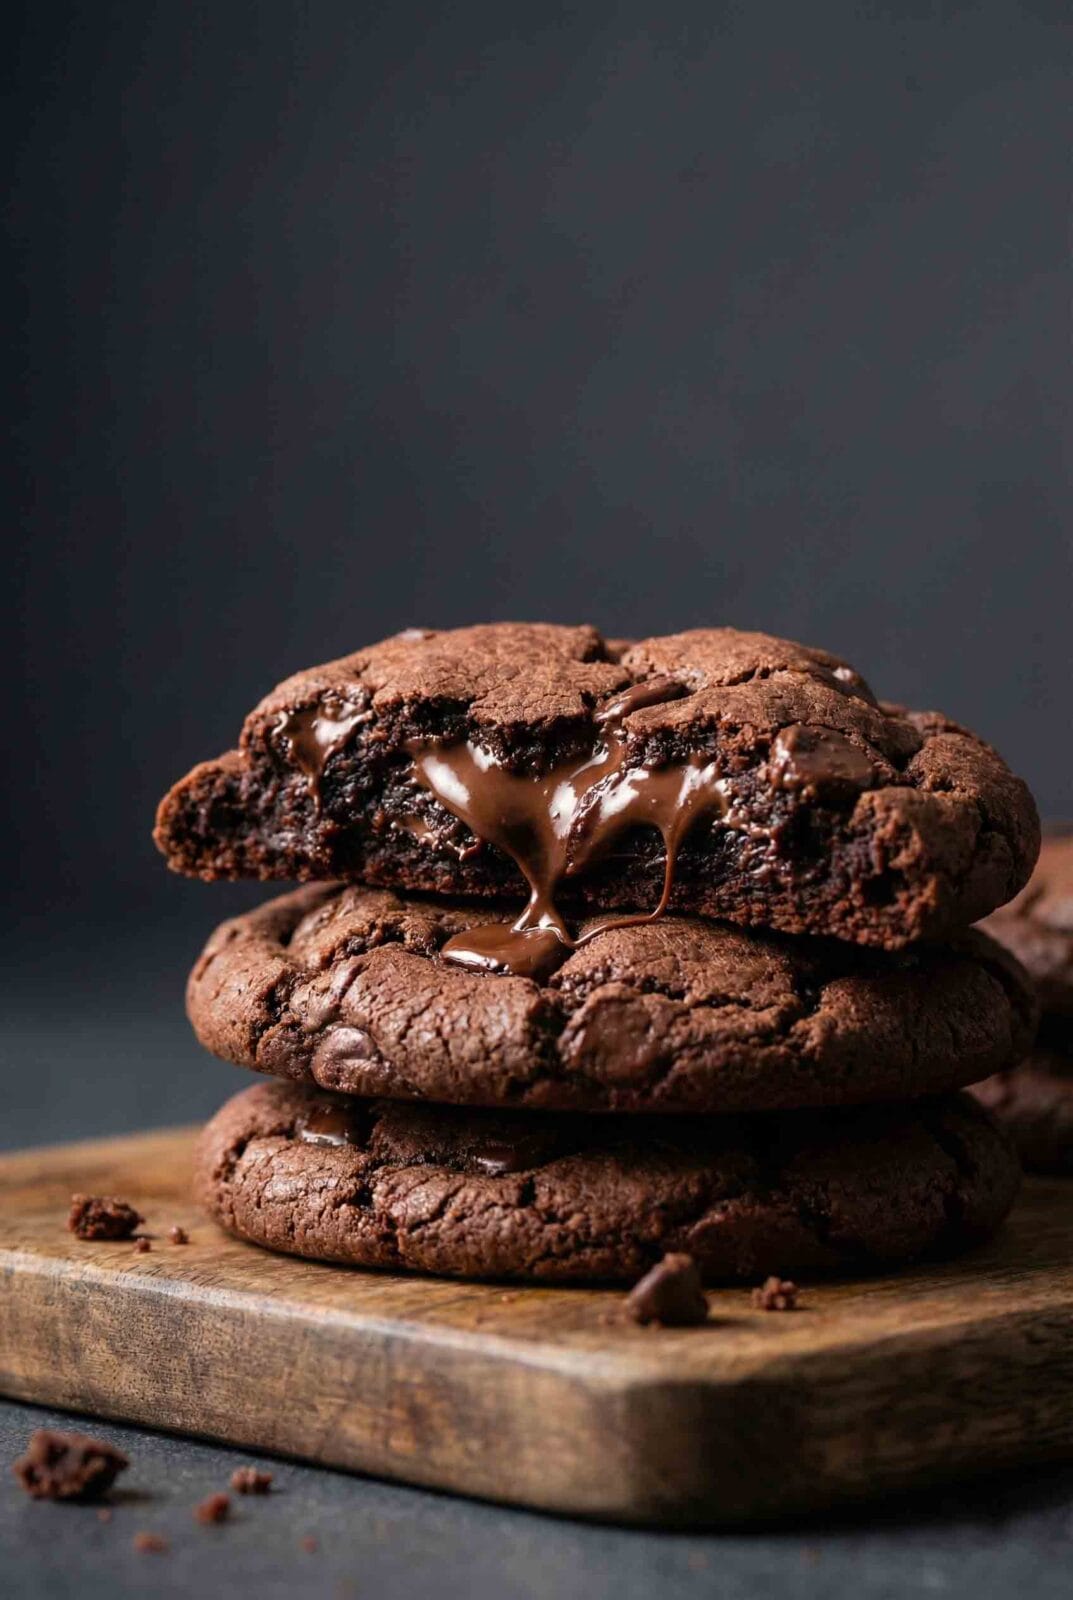
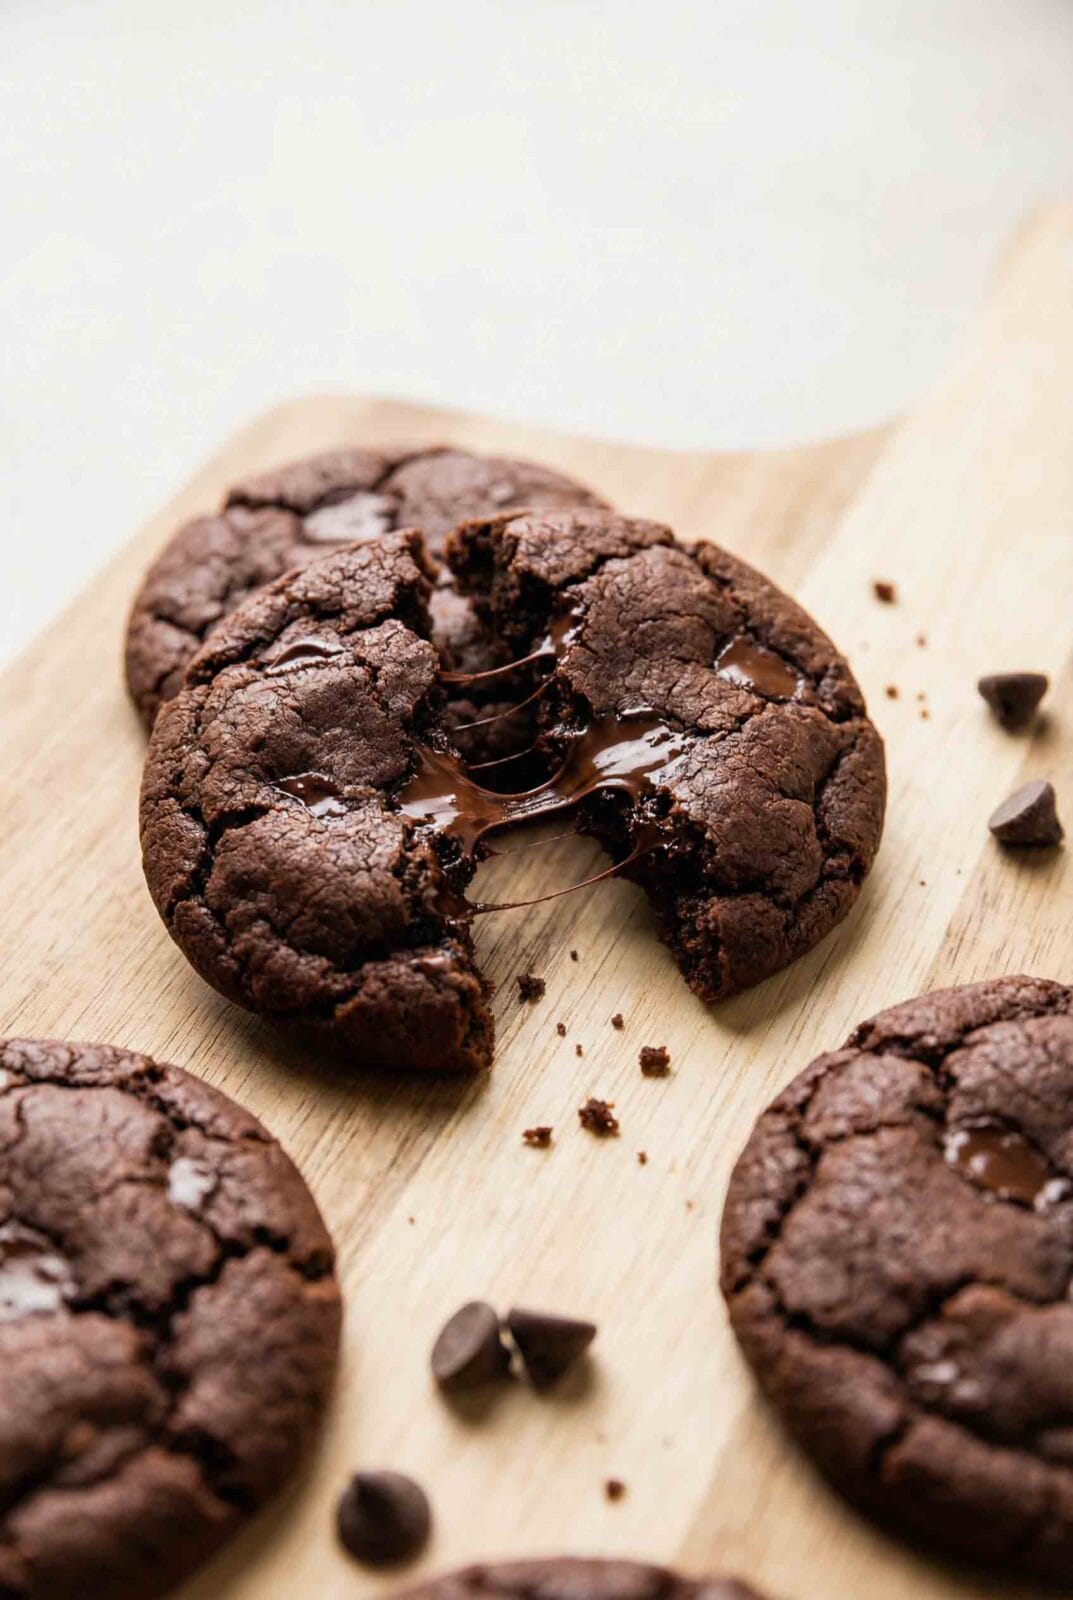
Double Chocolate Chip Cookies
Fudgy centers that taste like brownies, crisp edges with just the right snap, and pockets of melted chocolate in every bite—these double chocolate chip cookies stay soft for days with cocoa powder and a proper chill.

Double Chocolate Chip Cookies
Course: DessertsCuisine: AmericanDifficulty: Easy18
cookies15
minutes1
hour165
kcal1
hour30
minutesThick, fudgy double chocolate chip cookies with cocoa powder in the dough and melty chocolate chips throughout. Crisp edges meet soft, brownie-like centers in every bite. Chill time is essential for the best texture and flavor.
Ingredients
½ cup Unsalted Butter, softened to room temperature (113g)
½ cup Granulated Sugar (100g)
½ cup Light Brown Sugar, packed (100g)
1 Large Egg, room temperature
1 teaspoon Pure Vanilla Extract (5ml)
1 cup All-Purpose Flour, spooned and leveled (125g)
⅔ cup Natural Unsweetened Cocoa Powder (56g)
1 teaspoon Baking Soda (5g)
⅛ teaspoon Salt (1g)
1 tablespoon Milk, any kind (15ml)
1¼ cups Semi-Sweet Chocolate Chips (210g)
Directions
- In a large bowl or stand mixer, beat the softened butter, granulated sugar, and brown sugar on medium-high speed for 3-4 minutes until light and fluffy. Add the egg and vanilla extract. Beat on high speed for 30 seconds until smooth.
- In a separate bowl, whisk together the all-purpose flour, natural cocoa powder, baking soda, and salt until combined.
- With the mixer on low speed, add the dry ingredients to the butter mixture. Mix until a few streaks of flour remain. Add the milk and beat on high speed for 10-15 seconds until the dough comes together.
- Fold in the chocolate chips until evenly distributed.
- CRITICAL STEP: Cover the dough and refrigerate for at least 1 hour, preferably 3 hours or overnight. The dough must chill for proper texture and to prevent spreading.
- Preheat oven to 350°F (177°C). Line two baking sheets with parchment paper.
- Remove dough from refrigerator and let sit at room temperature for 10 minutes. Scoop dough into 1½ tablespoon portions (35-40g each). Shape into tall cylinders rather than round balls for thicker cookies. Place 2-3 inches apart on prepared baking sheets.
- Bake for 11-12 minutes until edges appear set and centers look matte and slightly soft. If cookies haven’t spread by minute 9, remove pan and bang firmly on counter 2-3 times, then return to oven.
- Cool cookies on the baking sheet for 5 minutes, then transfer to a wire rack to cool completely.
Notes
- Natural Cocoa Powder is Required: Use natural cocoa powder (like regular Hershey’s or Ghirardelli natural), NOT Dutch-process. Natural cocoa is acidic and reacts with the baking soda for proper rise and texture. Dutch-process will result in flat, bitter cookies.
- Chill Time is Mandatory: The cocoa powder needs time to hydrate and the dough needs to firm up. Minimum 1 hour, but 3 hours or overnight produces the best results with deeper chocolate flavor and thicker cookies.
- Room Temperature Butter: Butter should be cool to the touch but soft enough to leave a fingerprint—around 65-68°F. Too warm and cookies will spread excessively.
- Judging Doneness: Chocolate cookies don’t brown visibly. Look for edges that feel slightly set when tapped and centers that appear matte and soft, not glossy.
- Storage Tip: Store in an airtight container at room temperature for up to 5 days, refrigerate for up to 10 days, or freeze baked cookies for up to 3 months.
- Freezing Cookie Dough: Scoop chilled dough into balls, freeze on a baking sheet until solid, then transfer to a freezer bag. Freeze for up to 3 months. Bake from frozen, adding 1-2 minutes to bake time.
- International Substitutions: For UK/Australian readers, use caster sugar instead of granulated sugar. Plain flour works in place of all-purpose flour. Use full-fat milk or semi-skimmed milk.
Why This Recipe Works
“Double chocolate” means cocoa powder in the cookie dough plus chocolate chips mixed throughout—it’s two forms of chocolate working together, not double the chips. The cocoa powder creates a dense, fudgy base with deep chocolate flavor, while the chips add bursts of melty sweetness. This combination gives you intensity that regular chocolate chip cookies can’t match.
Cocoa powder behaves differently from melted chocolate in cookie dough. When you add cocoa, you’re introducing a dry ingredient that needs time to hydrate. Chilling for at least 1 hour (and up to 3 hours or overnight) allows the cocoa to bloom, developing richer flavor and creating a dough that holds its shape in the oven. The longer chill also gives you thicker cookies with crisp edges and soft centers. The ratio of butter to sugar to flour matters enormously—this recipe uses just enough butter to keep the texture soft and chewy without compromising structure. Brown sugar adds moisture and chewiness, while granulated sugar helps with spread and creates slightly crisp edges. Together with natural cocoa powder (which has acid that reacts with baking soda), you get cookies that rise just enough to stay thick without puffing into cakes.
Ingredient Notes
Unsalted Butter (½ cup, softened): Room temperature means cool to the touch but soft enough to leave a fingerprint when pressed—around 65-68°F. Too cold won’t cream properly; too warm makes cookies spread too much. Let it sit on the counter for 30-45 minutes before starting.
Granulated Sugar (½ cup): Adds sweetness and helps cookies spread. Also contributes to crisp edges because it melts faster than brown sugar in the oven.
Light Brown Sugar (½ cup, packed): The molasses keeps cookies soft and chewy and adds subtle caramel flavor. Pack it firmly into your measuring cup—loose brown sugar throws off the moisture balance.
Large Egg (1, room temperature): Binds the dough and adds structure. A cold egg can cause butter to seize up, so let it sit in warm water for 5 minutes if needed.
Pure Vanilla Extract (1 teaspoon): Enhances the chocolate flavor. Rounds out the sweetness and makes the chocolate taste deeper.
All-Purpose Flour (1 cup, spooned and leveled): Don’t scoop directly from the bag or you’ll pack in too much flour, leading to dry cookies. Spoon into your measuring cup and level with a knife, or use a scale.
Natural Unsweetened Cocoa Powder (⅔ cup): Use natural cocoa powder (like Hershey’s or Ghirardelli natural, not Special Dark), not Dutch-process. Natural cocoa is acidic and reacts with baking soda for proper rise and structure. Dutch-process cocoa has been neutralized—if you use it with baking soda, cookies may taste bitter and won’t rise correctly. Natural cocoa also has a sharper, more intense chocolate flavor.
Baking Soda (1 teaspoon): The leavening agent that makes cookies rise. Because we’re using natural cocoa powder (which is acidic), baking soda is the right choice.
Salt (⅛ teaspoon): Balances sweetness and amplifies chocolate flavor.
Milk (1 tablespoon, any kind): Cocoa powder is dry and can make cookies taste chalky without enough moisture. This hydrates the cocoa and keeps the dough tender. You can use dairy or non-dairy.
Semi-Sweet Chocolate Chips (1¼ cups): Semi-sweet strikes the perfect balance between sweet and bitter. You can use dark chocolate chips for more intense, less sweet cookies, or milk chocolate for something sweeter. Mini chips work too, but standard-size chips give you big melty pockets of chocolate.
Equipment tip: You’ll need a stand mixer or hand mixer for proper creaming, a cookie scoop (1½ tablespoon or medium size) for uniform cookies, light-colored baking sheets for even baking, and parchment paper or silicone baking mats to prevent sticking.
How to Make Double Chocolate Chip Cookies
Step 1: Creaming the Butter and Sugar ⏱️ 4-5 min
Place the softened butter in the bowl of your stand mixer (or a large bowl if using a hand mixer). Add the granulated sugar and brown sugar. Beat on medium-high speed for 3-4 minutes until the mixture is light, fluffy, and pale in color. You should see the texture change from dense and yellow to airy and almost white. Scrape down the sides and bottom of the bowl with a rubber spatula. Add the egg and vanilla extract. Beat on high speed for another 30 seconds until fully combined.
💡 Pro tip: The mixture should look smooth and glossy after adding the egg—this incorporates air that affects the final texture.
Step 2: Mixing the Chocolate Dough ⏱️ 2-3 min
In a separate medium bowl, whisk together the flour, cocoa powder, baking soda, and salt. Whisk thoroughly for 30 seconds to break up any lumps in the cocoa powder and distribute the leavening evenly. With your mixer on low speed, gradually add the dry ingredients to the butter mixture. Mix just until you see a few streaks of flour remaining—don’t overmix. The dough will be very thick and look almost crumbly at this stage. Pour in the tablespoon of milk. Beat on high speed for 10-15 seconds until the milk is fully incorporated and the dough comes together. Add the chocolate chips. Mix on low speed or fold them in by hand with a spatula until evenly distributed throughout the dough.
⚠️ Don’t skip this: The dough will be thick and slightly sticky—this is exactly what you want for fudgy cookies.
Step 3: Chilling and Shaping ⏱️ 1-3 hours chill + 5 min shaping
Cover the bowl tightly with plastic wrap or transfer the dough to an airtight container. Refrigerate for at least 1 hour. For thicker, more flavorful cookies, chill for 3 hours or overnight. The dough will firm up considerably and the cocoa flavor will deepen. When ready to bake, remove the dough from the refrigerator and let it sit at room temperature for 10 minutes (15-20 minutes if chilled overnight). Preheat your oven to 350°F. Line two baking sheets with parchment paper. Use your cookie scoop to portion the dough into balls—about 1½ tablespoons or 35-40 grams each. After scooping, roll each ball between your palms briefly, then shape it into a tall column or cylinder rather than a perfect sphere. Arrange the dough balls on your prepared baking sheets, spacing them 2-3 inches apart.
💡 Pro tip: Taller dough balls bake into thicker cookies instead of spreading flat. The dough will be sticky, so wipe your hands with a damp towel between cookies.
Step 4: Baking ⏱️ 11-12 min + 5 min pan cooling
Bake one sheet at a time in the center of your oven for 11-12 minutes. The edges will look set and slightly firm when you tap them gently with your finger. The centers will still look soft, slightly puffy, and have a matte finish rather than a glossy, wet appearance. Do not wait for the cookies to look fully baked—they’ll continue cooking on the hot pan after you remove them. If your cookies haven’t spread much by minute 9, remove the baking sheet from the oven and bang it firmly on the counter 2-3 times. This helps initiate spread and creates those crackled, wrinkled tops. Return to the oven to finish baking. When done, remove the baking sheet from the oven and let the cookies cool on the pan for 5 minutes. They’ll deflate slightly and firm up during this time. If you want picture-perfect cookies, press a few extra chocolate chips into the tops while they’re still warm. Transfer cookies to a wire rack to cool completely.
💡 Pro tip: You can’t rely on color because the cookies are already dark. Look for edges that feel slightly set and centers that look matte and soft, not glossy or wet.
Expert Tips
- Use room temperature butter, not melted. Butter should be soft enough to leave a dent when pressed, but still cool—around 65-68°F. Too warm and your cookies spread into flat puddles.
- Don’t skip the chill time. At minimum, chill the dough for 1 hour. For the thickest, most flavorful cookies, chill for 3 hours or overnight. The cocoa needs time to hydrate and cold dough spreads less.
- Use natural cocoa powder, not Dutch-process. Natural cocoa is acidic and reacts with the baking soda to create proper rise. Dutch-process cocoa has been neutralized and won’t react the same way, leading to flat or bitter cookies.
- Measure flour correctly. Spoon flour into your measuring cup and level it with a knife. Scooping directly from the bag packs in 20-30% more flour, making cookies dry and cakey.
Storage & Freezing
To Store: Place cooled cookies in an airtight container with parchment paper between layers if stacking. Store at room temperature for up to 5 days. The cookies may soften slightly after day 3, but they’ll still taste great. To refresh them, warm in a 300°F oven for 3-4 minutes.
To Refrigerate: Store in an airtight container in the refrigerator for up to 10 days. The cold makes them firmer and more fudgy. Let them sit at room temperature for 5-10 minutes before eating, or warm briefly in the microwave for 10-15 seconds.
To Freeze (Baked Cookies): Arrange cooled cookies in a single layer on a baking sheet and freeze until solid, about 1 hour. Transfer to a freezer-safe container or zip-top bag with parchment between layers. Freeze for up to 3 months. Thaw at room temperature for 20-30 minutes or microwave from frozen for 20-30 seconds.
To Freeze (Cookie Dough): After chilling the dough, scoop it into balls and arrange on a parchment-lined baking sheet. Freeze until solid, about 1 hour, then transfer to a freezer-safe bag. Freeze for up to 3 months. Bake from frozen, adding 1-2 minutes to the bake time. No need to thaw.
Frequently Asked Questions
What makes cookies “double chocolate”? Double chocolate means the recipe uses two forms of chocolate: cocoa powder mixed into the cookie dough itself, plus chocolate chips folded in. This is different from regular chocolate chip cookies, which only have chips in a plain dough.
Can I use Dutch process cocoa powder in cookies? Not in this recipe. Dutch process cocoa has been treated with an alkaline solution that neutralizes its acidity. Since this recipe uses baking soda (which needs acid to react properly), you must use natural cocoa powder. If you use Dutch process, your cookies may taste bitter, won’t rise correctly, and could turn out flat.
Why do my chocolate cookies spread too much? The most common cause is butter that’s too warm. Your butter should be cool to the touch—around 65°F—not soft or melty. Other causes include skipping the chill time (cocoa dough needs to firm up), using too much sugar relative to flour, or greasing your baking sheets instead of using parchment paper.