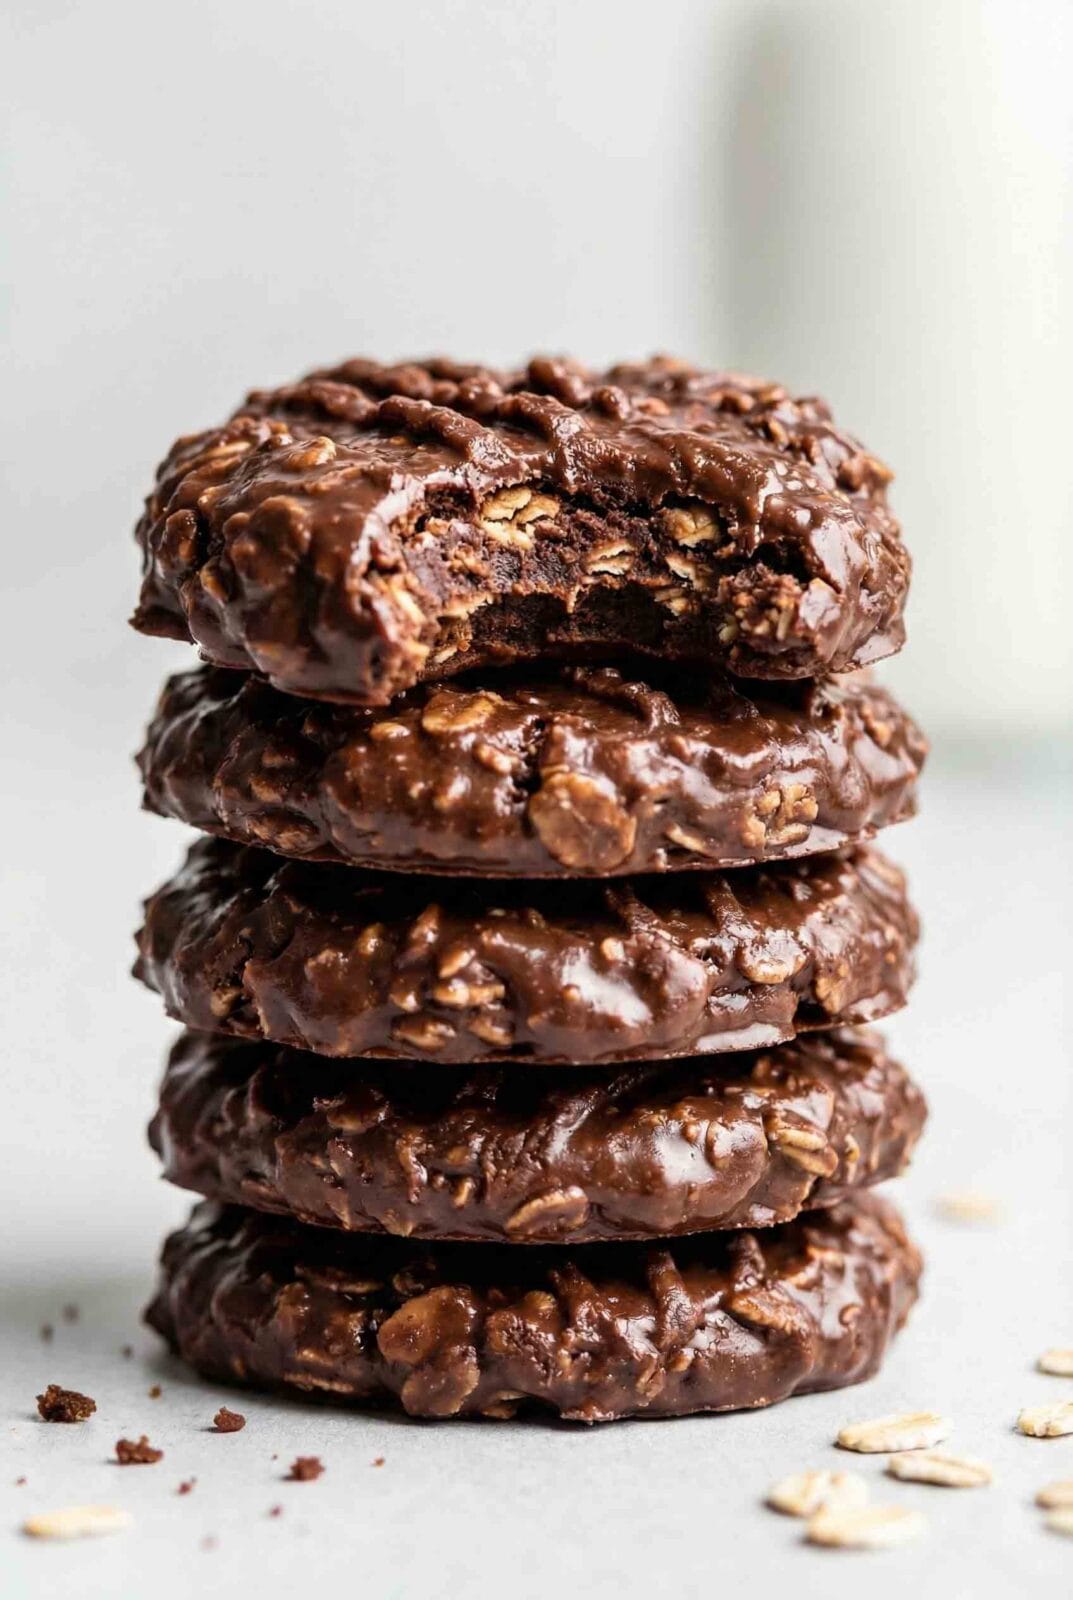
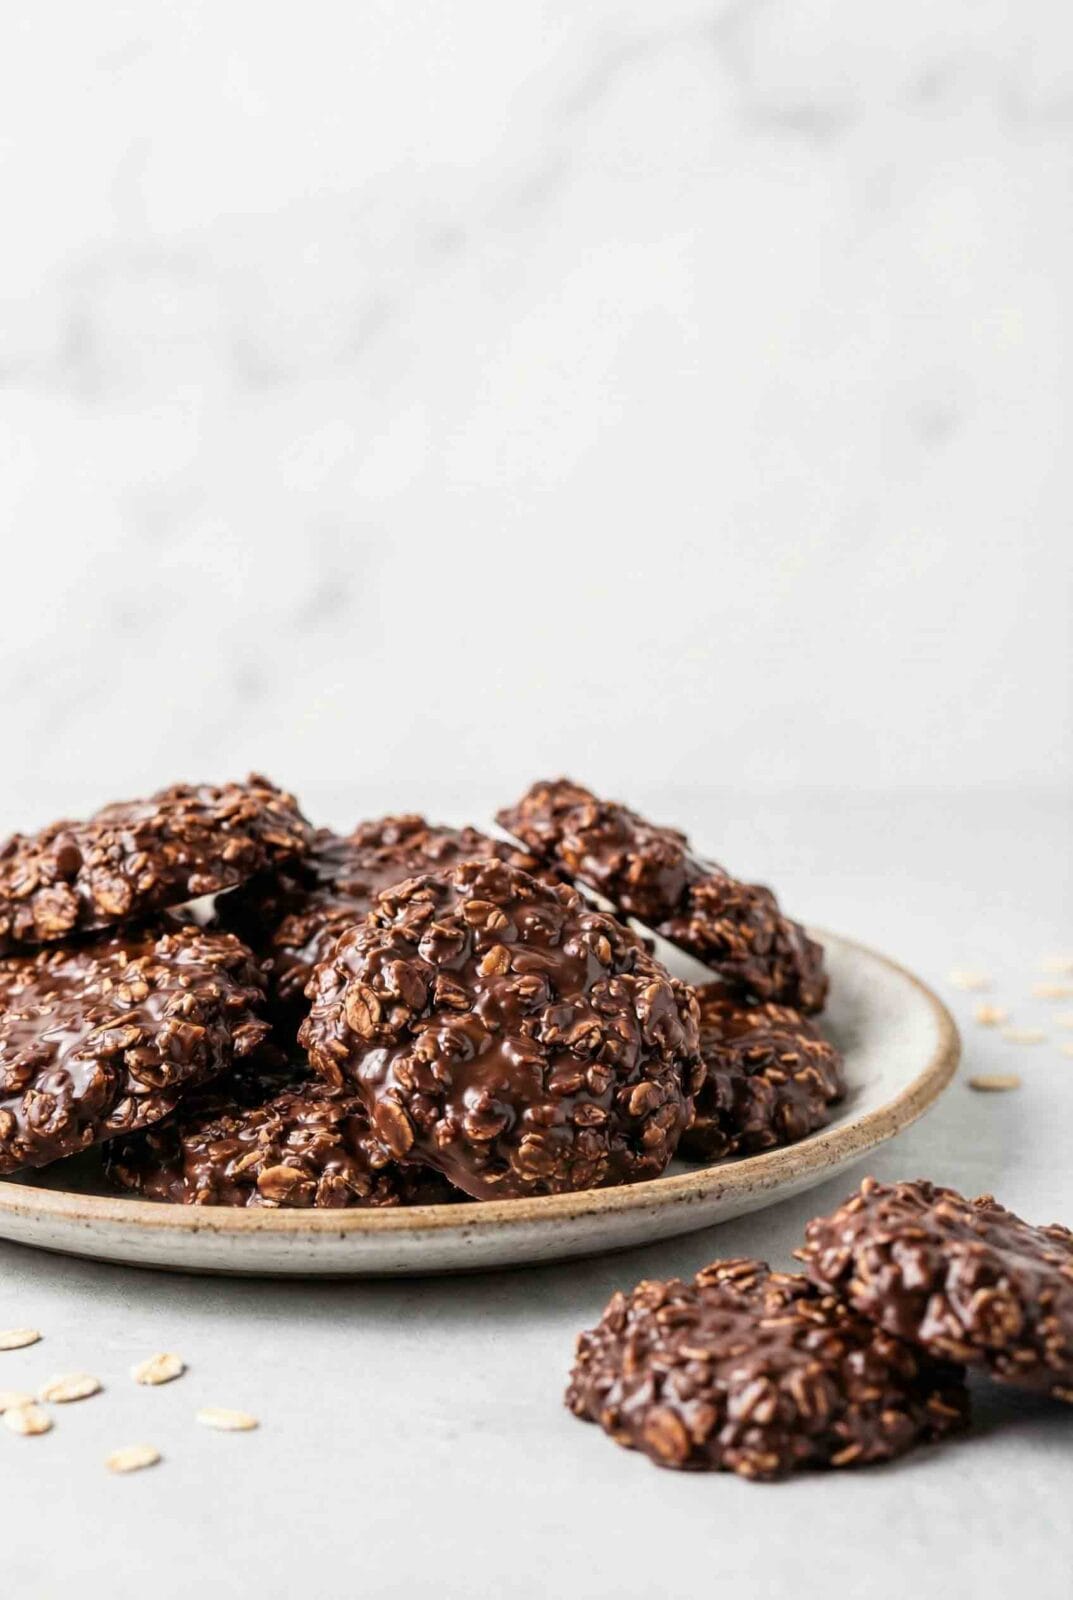
Chocolate No-Bake Cookies (Old Fashioned)
These aren’t the soft, crumbly no-bake cookies you might remember from a church potluck gone wrong. These are fudgy, chewy, and set firm every single time—thanks to old fashioned oats that hold their shape and a precisely timed boil that creates the perfect texture. One bite delivers deep chocolate flavor with a satisfying chew that quick oats can’t match.
Quick Summary
Bring sugar, butter, milk, and cocoa to a full rolling boil for exactly one minute. Remove from heat, stir in peanut butter, old fashioned oats, and vanilla, then drop spoonfuls onto wax paper. The hot sugar mixture firms up as it cools, binding the oats into chewy, fudgy cookies that need no oven.
Chocolate No-Bake Cookies (Old Fashioned)
Course: DessertsCuisine: AmericanDifficulty: Easy24
cookies5
minutes5
minutes145
kcal40
minutesOld fashioned chocolate no-bake cookies with chewy rolled oats, rich cocoa, and peanut butter. These fudgy stovetop cookies set firm in 30 minutes with no oven needed. Perfect for quick desserts or nostalgic treats.
Ingredients
2 cups Granulated Sugar (400g)
½ cup Whole Milk (120ml)
½ cup Unsalted Butter, cut into slices (113g)
½ cup Unsweetened Cocoa Powder (43g)
¼ teaspoon Salt (1g)
½ cup Creamy Peanut Butter (125g)
3 cups Old Fashioned Oats (270g)
1 teaspoon Pure Vanilla Extract (5ml)
Directions
- Line your counter or two baking sheets with wax paper or parchment paper. Set aside.
- In a heavy-bottomed saucepan over medium heat, melt the butter completely. Add the granulated sugar, whole milk, unsweetened cocoa powder, and salt. Stir until smooth and no cocoa streaks remain.
- Continue stirring as the mixture heats. Bring to a full rolling boil (entire surface covered with large, vigorous bubbles). Once at a rolling boil, set timer for exactly 1 minute. Stir constantly during the boil.
- After 1 minute, immediately remove pan from heat. Quickly stir in the creamy peanut butter until completely melted and smooth, about 30 seconds.
- Add the old fashioned oats and vanilla extract. Stir rapidly until all oats are evenly coated with the chocolate mixture, about 1 minute.
- Working quickly, drop mixture by heaping 2-tablespoon spoonfuls onto the prepared wax paper. Do not flatten. Let sit undisturbed at room temperature for 20-30 minutes until completely set.
- Once firm, peel cookies from wax paper and store in an airtight container.
Notes
- Critical Timing: Do not start your timer until the mixture reaches a full rolling boil with large bubbles covering the entire surface. Boiling less than 1 minute will result in sticky cookies that won’t set. Boiling more than 1 minute will make them dry and crumbly.
- Oat Type Matters: Old fashioned oats (rolled oats) create a chewy texture. Quick oats will work but produce softer, less structured cookies. Do not use steel-cut oats.
- Butter Brand: Avoid butter brands with high water content (such as Kirkland). Use standard brands like Land O’Lakes or Challenge for best results.
- Storage Tip: Store in an airtight container at room temperature for up to 2 weeks, refrigerate for up to 3 weeks, or freeze for up to 3 months.
- Humidity Fix: If cookies won’t set after 30 minutes (common in humid weather), refrigerate for 15 minutes to firm them up.
- High Altitude: If baking above 5,000 feet elevation, increase boil time to 1 minute and 15 seconds.
- International Substitutions: For UK/Australian readers, use caster sugar instead of granulated sugar. Whole milk can be replaced with full-fat milk. Old fashioned oats are the same as rolled oats or porridge oats.
Why This Recipe Works
The one-minute boil isn’t arbitrary—it’s chemistry. When you boil sugar and butter together, you’re creating a soft-ball stage candy syrup (around 235°F). This concentration of sugar gives the cookies structure as they cool. Boil too little and the cookies stay sticky. Boil too long and they turn dry and crumbly. That single minute is the sweet spot.
Old fashioned oats contain more structure than quick oats because they’re rolled thicker and retain their shape during processing. When coated with hot sugar syrup, they soften just enough to bind together while keeping a chewy bite. Quick oats, by contrast, break down too much and can turn mushy or fail to hold shape. The difference in texture is dramatic.
Peanut butter acts as both flavor and binder. Its fat content helps the mixture stay cohesive, while its protein adds body. Combined with the cocoa powder, you get a rich chocolate-peanut butter flavor that tastes like fudge but sets up firm enough to stack in a container. These cookies have been a Southern staple for generations—sometimes called preacher cookies because they were quick enough to whip up when the pastor stopped by unexpectedly.
Ingredients Notes
Granulated Sugar (2 cups): The foundation of the recipe. Sugar is what creates the candy-like structure when boiled. Don’t substitute with brown sugar or coconut sugar—they contain moisture that prevents proper setting.
Whole Milk (½ cup): Adds richness and helps the sugar mixture reach the right consistency. Whole milk works best, but you can use 2% if needed. Some bakers swear by evaporated milk for an extra-fudgy texture—it has less water, so the mixture thickens faster. Avoid skim milk, which is too watery.
Unsalted Butter (½ cup, cut into slices): Real butter is non-negotiable. Margarine has too much water and won’t create the right texture. Use unsalted so you can control the salt level. Some butter brands (notably Kirkland) have been reported to cause setting problems due to higher water content—stick with standard grocery store brands like Land O’Lakes or Challenge.
Unsweetened Cocoa Powder (½ cup): Use natural cocoa powder for the most traditional chocolate flavor. Dutch-process cocoa works too and gives a darker color, but natural cocoa has a sharper, more intense chocolate taste that pairs well with the sweetness. Don’t use hot cocoa mix—it contains sugar and milk powder.
Creamy Peanut Butter (½ cup): Use processed, no-stir peanut butter like Jif or Skippy. Natural peanut butter has separated oil that can make the cookies greasy or prevent them from setting properly. If you only have natural, stir it very well and expect a slightly different texture. Crunchy peanut butter works if you want extra texture, but creamy is traditional.
Old Fashioned Oats (3 cups): This is what makes these “old fashioned.” Rolled oats (another name for old fashioned oats) are thicker and chewier than quick oats. They hold their shape when coated with the hot sugar mixture, giving you cookies with texture and bite. Quick oats will work in a pinch, but the cookies will be softer and less chewy. Steel-cut oats are too hard and won’t soften enough—don’t use them.
Pure Vanilla Extract (1 teaspoon): Rounds out the chocolate and peanut butter flavors. Use real vanilla extract, not imitation.
Salt (¼ teaspoon): Balances the sweetness and enhances the chocolate flavor. Even if you use salted butter, add this—it’s necessary.
Essential Equipment
- Heavy-Bottomed Saucepan (at least 3-quart capacity): A thin pan will cause hot spots and uneven boiling, which throws off your timing. Heavy-bottomed pans distribute heat evenly and prevent scorching.
- Kitchen Timer: You need to time the boil precisely. Phone timers work, but a dedicated kitchen timer keeps you focused.
- Wax Paper or Parchment Paper: Line your counter or baking sheets before you start. Wax paper is traditional and the cookies release easily. Parchment works too. Don’t use foil—cookies can stick.
- Cookie Scoop (2-tablespoon size): Speeds up the dropping process and gives you uniform cookies. Work fast once you’ve added the oats—the mixture starts to set quickly.
How To Make Chocolate No-Bake Cookies (Old Fashioned): Step-by-Step Instructions
Boiling the Sugar Mixture
- Before you turn on the stove, lay out sheets of wax paper on your counter or on baking sheets. You’ll need to work quickly once the mixture is ready, so have everything in place.
- Measure out your peanut butter, oats, and vanilla in separate bowls and set them next to the stove.
- Place your heavy-bottomed saucepan over medium heat. Add the butter slices and let them melt completely—this takes about 2 minutes.
- Once melted, add the granulated sugar, milk, cocoa powder, and salt. Stir everything together with a wooden spoon or heatproof spatula until the sugar dissolves and the mixture is smooth. No dry cocoa streaks should remain.
- Keep stirring as the mixture heats. After a few minutes, you’ll see small bubbles forming around the edges. Keep going. You’re waiting for a full rolling boil—this means the entire surface of the mixture is covered in large, vigorous bubbles that don’t stop when you stir. The mixture will look foamy and frothy. This is critical.
- Once you hit that full rolling boil, start your timer for exactly one minute. Do not start the timer before you see that rolling boil. Keep stirring constantly during this minute to prevent burning. The mixture will foam up and look almost angry—that’s what you want.
- At the one-minute mark, immediately remove the pan from the heat. The mixture should look glossy and thick.
Adding the Oats and Peanut Butter
- Working quickly now, add the peanut butter to the hot mixture and stir vigorously until it melts completely into the chocolate base. This takes about 30 seconds. The mixture should be smooth and shiny.
- Dump in all the old fashioned oats and the vanilla extract. Stir rapidly with your wooden spoon, folding the oats into the chocolate mixture until every oat is coated and no dry patches remain.
- The oats will soak up the hot syrup immediately. You have about 2-3 minutes before the mixture starts to firm up in the pan, so move with purpose.
Scooping and Setting
- Use your cookie scoop or a large spoon to drop heaping spoonfuls of the mixture onto the wax paper. Aim for about 2 tablespoons per cookie. Don’t flatten them—let them form their own mounds.
- The cookies will be soft and shiny at first. Let the cookies sit undisturbed at room temperature for 20-30 minutes. They’ll firm up as they cool, developing that characteristic fudgy-chewy texture.
- Don’t touch them or try to move them before they’re fully set—you’ll ruin the glossy tops. Once firm, they’ll peel off the wax paper cleanly.
Pro-Tip
If your kitchen is very humid or warm (above 75°F), the cookies may take longer to set or stay slightly soft. Pop them in the refrigerator for 15 minutes to firm them up quickly. If you accidentally overboiled and your cookies turned out dry and crumbly, you can rescue the batch by microwaving them for 10-15 seconds to soften slightly—they’ll still taste good, just less perfect in texture. For high-altitude baking (above 5,000 feet), increase the boil time to 1 minute and 15 seconds—the lower boiling point of water at altitude requires extra time to concentrate the sugar properly.
Expert Tips for Perfect Old Fashioned No-Bake Cookies
- Use a heavy-bottomed pan to prevent scorching. Thin pans create hot spots that throw off the boil timing and can burn the sugar before it reaches the right temperature.
- Don’t start the timer until you see a full rolling boil. The entire surface should be covered in large, vigorous bubbles. If you start timing too early, your cookies won’t set.
- Work quickly after removing from heat. Once you add the peanut butter and oats, you have 2-3 minutes before the mixture starts to harden in the pan. Have your wax paper ready and your cookie scoop in hand.
- Avoid substituting butter brands known for high water content. Kirkland butter has been reported to cause setting problems in this recipe. Stick with mainstream brands like Land O’Lakes or Challenge.
- Use old fashioned oats, not quick oats. Old fashioned oats provide the chewy texture that makes these cookies special. Quick oats will give you a softer, less structured cookie.
- Don’t walk away from the stove. Sugar mixtures can burn in seconds if left unattended. Stir constantly, especially during the boil.
- Let the cookies set completely before touching them. Moving them too soon will smudge the glossy tops and can cause them to fall apart.
- If cookies won’t set after 30 minutes at room temperature, refrigerate them for 15 minutes. This usually happens in humid weather or if the mixture didn’t quite reach a full boil.
- For extra chocolate flavor, use Dutch-process cocoa. It has a deeper, darker chocolate taste than natural cocoa, though both work perfectly.
Storage & Freezing
To Store: Layer the completely set cookies in an airtight container with wax paper or parchment between layers to prevent sticking. They’ll stay fresh at room temperature for up to 2 weeks. The cookies may soften slightly over time but will still taste great. If they get too soft, a few minutes in the refrigerator will firm them back up.
To Refrigerate: Store in an airtight container in the refrigerator for up to 3 weeks. The cold makes them extra firm and fudgy—some people prefer them this way. Let them sit at room temperature for 5 minutes before eating if you want a softer texture.
To Freeze: Place set cookies in a single layer on a baking sheet and freeze until solid, about 1 hour. Transfer to a freezer-safe container or zip-top bag with parchment between layers. Freeze for up to 3 months. Thaw at room temperature for 10-15 minutes, or eat them straight from the freezer for a cold, fudgy treat.
FAQ
- Why are my no-bake cookies not hardening?
The most common cause is not boiling the mixture long enough or not reaching a full rolling boil before starting the timer. The sugar needs to reach soft-ball stage (around 235°F) to create the structure that makes cookies set. If your kitchen is very humid, that can also prevent setting—try refrigerating the cookies for 15 minutes to help them firm up. - Can you use quick oats instead of old fashioned oats in no-bake cookies?
You can, but the texture will be different. Quick oats are more finely cut and will absorb the hot mixture faster, giving you softer, less chewy cookies. Old fashioned oats hold their shape better and create the classic chewy texture these cookies are known for. If you only have quick oats, reduce the amount slightly to 2 ¾ cups to prevent the cookies from becoming too dense. - How long do you boil no-bake cookies?
Exactly one minute at a full rolling boil. Start timing only when the entire surface is covered with large, vigorous bubbles that don’t stop when you stir. Boiling less than a minute will give you sticky cookies that won’t set. Boiling more than a minute (or up to 1 minute 15 seconds) will make them dry and crumbly. - Why are my no-bake cookies dry and crumbly?
You overboiled the sugar mixture. Even 15-20 extra seconds can push the mixture past soft-ball stage into firm-ball stage, which removes too much moisture. The cookies will taste okay but won’t have that fudgy texture. Next time, watch your timer carefully and remove from heat right at the one-minute mark. - Can you freeze no-bake cookies?
Yes. Freeze them in a single layer first, then transfer to an airtight container with parchment between layers. They’ll keep for up to 3 months. Thaw at room temperature or eat them frozen—they’re like fudgy little chocolate bites straight from the freezer. - What is the difference between old fashioned oats and quick oats?
Old fashioned oats (also called rolled oats) are steamed and rolled flat but stay relatively thick. Quick oats are cut into smaller pieces before rolling, so they cook faster and have a finer texture. In no-bake cookies, old fashioned oats provide more chew and structure, while quick oats make softer cookies. - Why are they called preacher cookies?
The name comes from Southern tradition. These cookies are so quick to make—no preheating, no baking time—that you could whip up a batch when the preacher showed up unexpectedly for a visit. They’re also sometimes called “funeral cookies” because they were easy to make in large quantities for church gatherings. The name stuck, and now they’re a nostalgic favorite across the country.