Perfect Checkerboard Cake: The Stunning Interior Pattern Anyone Can Master
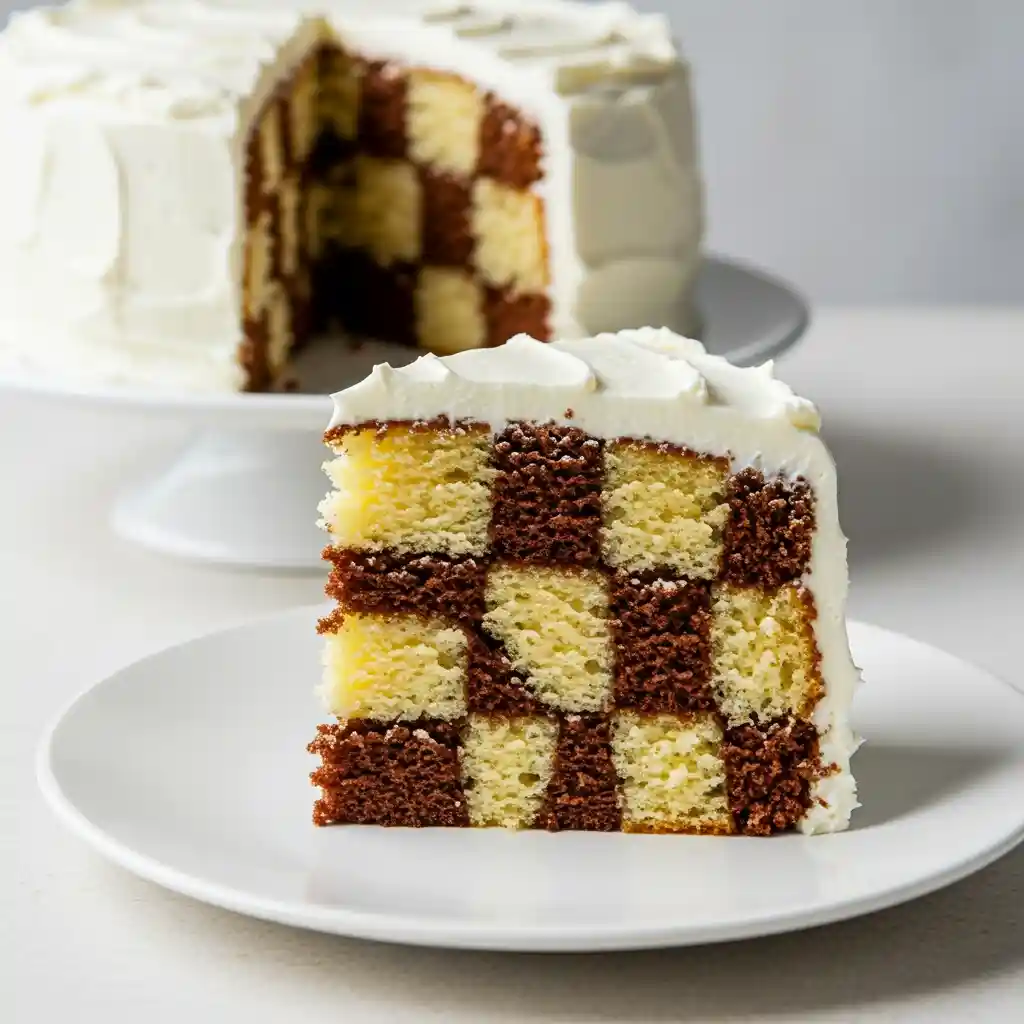
The first slice reveals the magic – perfect squares of vanilla and chocolate cake arranged in an eye-catching checkerboard pattern that never fails to impress. My checkerboard cake journey started five years ago when my daughter requested something “extra special” for her birthday. Dozens of test batches later, I’ve perfected this checkerboard cake recipe that delivers consistent results without specialized pans. The key? A simple batter that holds its shape, precise measurements, and my foolproof assembly method that prevents the batters from bleeding together.

Why This Recipe Works
- Single batter base with divided flavors ensures consistent texture throughout both cake colors, unlike recipes that use entirely different batters which can bake unevenly
- Cake flour and buttermilk create a tender crumb that slices cleanly without crumbling, crucial for displaying the pattern
- Precise measuring of concentric rings guarantees perfect squares when sliced, not the uneven blobs you often see in other recipes
- Brief refrigeration of assembled pans before baking helps maintain the distinct pattern boundaries during baking
Ingredient Notes & Substitutions
Cake flour produces a tender, fine crumb that’s essential for clean-cut checkerboard squares. If unavailable, substitute all-purpose flour mixed with cornstarch (for every cup of cake flour, use 1 cup minus 2 tablespoons of all-purpose flour plus 2 tablespoons of cornstarch).
Buttermilk adds moisture and activates the baking soda. No buttermilk on hand? Make a quick substitute by adding 1 tablespoon of lemon juice or white vinegar to 1 cup of milk and letting it stand for 5 minutes.
Unsalted butter gives you control over the salt content. If using salted butter, omit the additional salt in the recipe.
Vanilla extract provides the base flavor for the white portions. Use pure vanilla extract rather than imitation for the best flavor – I prefer Nielsen-Massey for its rich, full-bodied taste.
Dutch-processed cocoa powder creates the chocolate portions with minimal bitterness. Natural cocoa powder works too, but the color contrast won’t be as striking, and the chocolate sections may taste slightly more acidic.
Neutral vegetable oil adds moisture without competing flavors. I use grapeseed oil, but canola or sunflower oil work equally well.
Essential Equipment
8-inch round cake pans (three identical ones) are the perfect size for this recipe. Smaller pans make the checkerboard sections too tiny, while larger pans require more batter and risk uneven baking.
Large round cookie cutter or bowl (approximately 5 inches in diameter) serves as your guide for cutting the first ring. This ensures consistent sizing across all cake layers.
Small round cookie cutter (approximately 2 inches in diameter) creates the inner ring. I use the rim of a shot glass when I can’t find my cutter.
Offset spatula helps transfer the cake rings without breaking them. This tool makes the difference between clean pattern assembly and a frustrating mess.
Kitchen scale guarantees equal amounts of batter for both flavors and even distribution among the pans. Precision matters enormously for this recipe.
Step-by-Step Instructions
Preparing the Batter
Preheat your oven to 350°F (175°C). Grease and line three 8-inch round cake pans with parchment paper circles.
In a medium bowl, whisk together the cake flour, baking powder, baking soda, and salt. Set aside.
In a large bowl or stand mixer, beat the butter and sugar for 3-4 minutes until pale and fluffy. This incorporates air for a lighter texture.
Add the eggs one at a time, beating well after each addition. The mixture should look smooth and creamy.
Mix in the vanilla extract and vegetable oil until combined.
Alternate adding the dry ingredients and buttermilk, beginning and ending with the dry ingredients (3 additions of dry, 2 of buttermilk). Mix just until combined after each addition – the batter should look smooth but not overworked.
Divide the batter equally into two bowls, using a kitchen scale for accuracy. You should have approximately 2½ cups (600g) of batter in each bowl.
To one bowl, add cocoa powder and the extra 2 tablespoons of milk. Fold gently until no streaks remain and the batter is a uniform chocolate color.
Creating the Checkerboard Pattern
Divide each batter (vanilla and chocolate) into three equal portions, giving you six portions total. Again, use a scale for accuracy.
For each cake pan, you’ll create three concentric rings of alternating batters. Start by spooning one portion of vanilla batter into the center of the first pan, spreading it into a circle about 2-3 inches in diameter.
Carefully add chocolate batter around this center, creating a ring that extends to about 5-6 inches in diameter.
Finish with vanilla batter in the outermost ring, filling to the edge of the pan.
For the second pan, reverse the pattern: chocolate center, vanilla middle ring, chocolate outer ring.
Repeat the first pattern for the third pan: vanilla center, chocolate middle, vanilla outer.
Tap each pan firmly on the counter several times to remove air bubbles and help the batter settle into place.
Place the pans in the refrigerator for 15 minutes. This helps set the patterns before baking.
Baking and Cooling
Bake the cakes for 22-25 minutes, or until a toothpick inserted in the center comes out clean or with a few moist crumbs.
Allow the cakes to cool in the pans for 10 minutes before turning out onto wire racks to cool completely.
Frosting and Assembly
While the cakes cool, prepare your favorite vanilla frosting. A basic American buttercream works perfectly.
Once completely cooled, place your first cake layer (pattern 1) on a serving plate or cake board.
Spread a thin layer of frosting evenly over the top.
Place the second layer (pattern 2) on top, rotating it slightly to align the patterns for maximum checkerboard effect.
Add another layer of frosting, then top with the final cake layer (pattern 1 again).
Frost the entire cake with a thin crumb coat, chill for 15 minutes, then apply the final coat of frosting.
Expert Tips for Success
- Measure your ring sizes consistently across all pans. I mark my offset spatula with small pieces of tape as guides for uniform circles.
- Don’t overmix the batter after adding the flour. Overmixing develops gluten, making the cake tough rather than tender.
- Chill the assembled pans before baking. This 15-minute refrigeration helps set the pattern and prevents the batters from bleeding into each other.
- Level your cakes after cooling if they have domed. Flat layers stack better and create cleaner checkerboard patterns.
- When cutting the cake, use a sharp, clean knife and wipe between slices for the most impressive reveal of your checkerboard pattern.
Flavor Variations
Marble Checkerboard
Instead of making the chocolate portion with cocoa powder, use food coloring to create a marbled effect. Divide the vanilla batter and add different gel food colors to each portion, then assemble as directed.
Red Velvet Checkerboard
Replace the chocolate portion with red velvet batter by adding 1 tablespoon of cocoa powder, 2 tablespoons of red food coloring, and 1 teaspoon of vinegar to that portion of the batter.
Lemon-Blueberry Checkerboard
For the light portions, add 2 tablespoons of lemon zest and 1 teaspoon of lemon extract. For the dark portions, fold in 1 cup of blueberries tossed with 1 tablespoon of flour and add blue food coloring if desired.
Storage & Freezing
The assembled cake stays fresh at room temperature for up to 3 days if stored in an airtight container or cake dome.
Refrigerate for up to 5 days, but bring to room temperature before serving for the best texture and flavor.
For longer storage, freeze individual slices wrapped tightly in plastic wrap and placed in a freezer bag for up to 3 months. Thaw in the refrigerator overnight, then bring to room temperature before serving.
Unfrosted cake layers can be frozen for up to 3 months. Wrap each cooled layer individually in plastic wrap, then aluminum foil. Thaw at room temperature for about 2 hours before frosting.
FAQ
Can I make this cake ahead of time?
Yes! The cake layers can be baked up to 2 days ahead and stored tightly wrapped at room temperature. You can also fully assemble and frost the cake a day before serving.
Why didn’t my checkerboard pattern show up clearly?
The most common causes are: batters that were too thin and ran together, rings that weren’t evenly sized across all layers, or not chilling the assembled pans before baking.
Can I use cake mixes for this recipe?
Yes, but choose mixes with similar densities. Add an extra egg to box mixes to make the batter sturdier and less likely to bleed together.
Do I need a special checkerboard cake pan?
No! This method uses regular round cake pans and creates the pattern by carefully arranging the batter. Special checkerboard pans exist, but this technique gives you more control.
How do I get perfect slices that show the pattern?
Use a sharp knife, cut straight down (don’t saw), and wipe the knife clean between cuts. Refrigerating the frosted cake for 30 minutes before slicing also helps.

Checkerboard Cake: A Stunning Dessert Anyone Can Master
Course: DessertsCuisine: AmericanDifficulty: Intermediate12
slices45
minutes25
minutes450
kcal1
hour10
minutesCreate a stunning checkerboard cake with perfect vanilla and chocolate squares inside. This foolproof method needs no special pans—just simple techniques for showstopping results.
Ingredients
- For the Cake:
3 cups (345g) – Cake flour
1 tsp (4g) – Baking powder
1/2 tsp (3g) – Baking soda
1/2 tsp (3g) – Salt
1 cup (226g) – Unsalted butter (room temperature)
2 cups (400g) – Granulated sugar
4 large – Eggs (room temperature)
2 tsp (10ml) – Vanilla extract
2 tbsp (30ml) – Vegetable oil
1 cup (240ml) – Buttermilk (room temperature)
1/3 cup (40g) – Dutch-processed cocoa powder
2 tbsp (30ml) – Milk (for chocolate portion)
- For the Vanilla Buttercream:
1 1/2 cups (340g) – Unsalted butter (room temperature)
5 cups (600g) – Powdered sugar
3 tbsp (45ml) – Heavy cream
2 tsp (10ml) – Vanilla extract
1/4 tsp (1.5g) – Salt
Directions
- Preheat oven to 350°F (175°C). Grease and line three 8-inch cake pans with parchment paper.
- Whisk together cake flour, baking powder, baking soda, and salt in a medium bowl.
- Beat butter and sugar for 3-4 minutes until fluffy. Add eggs one at a time, then vanilla and oil.
- Alternate adding dry ingredients and buttermilk, beginning and ending with dry ingredients.
- Divide batter equally into two bowls (about 600g each).
- Add cocoa powder and extra milk to one bowl, folding until uniform in color.
- Divide each batter (vanilla and chocolate) into three equal portions.
- For first pan: add vanilla in center (2-inch circle), surround with chocolate ring, finish with vanilla outer ring.
- For second pan: chocolate center, vanilla middle ring, chocolate outer ring.
- For third pan: repeat pattern from first pan.
- Tap pans on counter to remove air bubbles. Refrigerate for 15 minutes.
- Bake for 22-25 minutes until toothpick comes out clean.
- Cool in pans 10 minutes before removing to wire racks to cool completely.
- Prepare buttercream: beat butter until creamy, gradually add powdered sugar, cream, vanilla, and salt.
- Stack cake layers with frosting between each, alternating patterns for checkerboard effect.
- Apply crumb coat, chill 15 minutes, then finish with final coat of frosting.
Notes
- 1. Measure ring sizes consistently across all pans for the perfect checkerboard pattern.
2. Refrigerating the assembled pans before baking prevents batters from bleeding together.
3. Use a sharp knife and wipe between slices for the cleanest reveal of the checkerboard pattern.